How to integrate SAS with Jira
SAS offers a number of app integrations that are designed to make your life easier. JIRA is an online support ticket system that enables you to keep track of all new support tickets submitted by your customers, manage approval workflows, and more. If your business uses this software, integrating your account with the JIRA app in the portal will automatically push data from your calls into your ticketing system. This eliminates the need for you to do double the work, converting messages into JIRA cases.
In this article we'll discuss:
Connect JIRA with Your SAS Account
1
In the SAS Desk portal, click Apps from the left side menu. From the Apps screen, click the Configure button under JIRA logo.

2
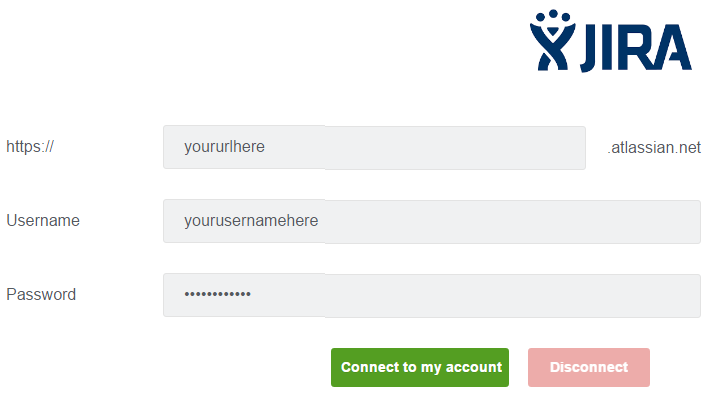
On the next screen, type your JIRA URL, Username and Password, and then click Connect to my account.
Setting Contact Data Parameters
1
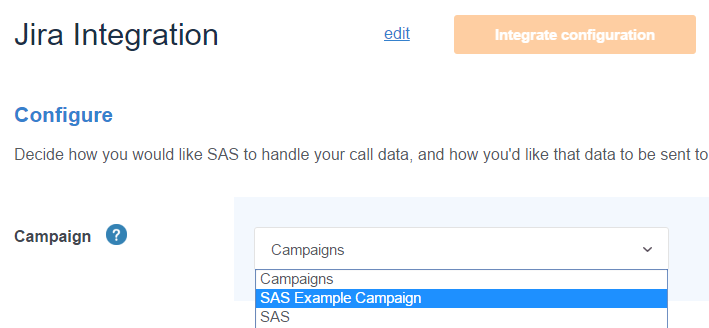
Now that JIRA is connected to the app, click Add configuration to begin the set-up.

2
The JIRA Integration section will be displayed. This is where you'll set the parameters for how you'd like call data to be sent to JIRA.
3
First, select the Script that you'll be connecting.
4
Next, you'll need to tell the system which JIRA project to associate with this integration. Callers' details will be sent to the project you select.

5
Now, select the Issue Type that corresponds to the support cases we will be submitting. Keep in mind that you can create a separate integration for each issue. These would need to follow separate call paths in your script.

Create Your Support Ticket
Once the configurations are set, you'll need to create the content of the case we'll be starting in JIRA.
1
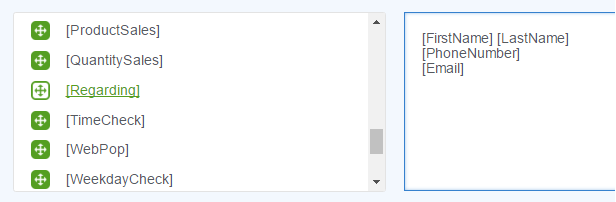
Next to Description, you'll see a list of all of the custom step labels associated with the campaign you selected, in addition to default variables, such as [FirstName], [PhoneNumber], [Email], etc. If you have multiple paths in your script, they will each have a different set of variables. So, you'll need to access the call script builder to determine the step labels in the specific path you are mapping.
You can build a separate integration for every script path, each with their corresponding step labels.
Click and drag the variables from the left side to the box on the right.
2
After you add the variables that you'd like to appear in the case, be sure to format them by placing each element on a separate line. You can also add headings such as, "Phone Number: [PhoneNumber]."
JIRA Custom Mappings (Optional)
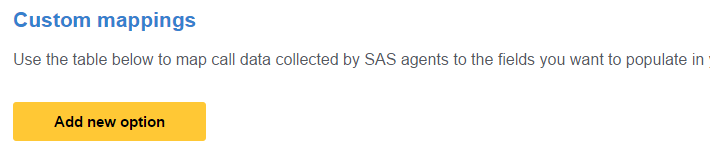
Once the data section is complete, you can map your call data directly to specific JIRA fields by adding Custom mappings.
1
To begin, click Add new option.
2
In the first drop down box, select either SAS or Text.
SAS will allow you to use specific SAS script variables to populate JIRA's support ticket fields. If you select SAS, the second column will allow you to select a script variable.
Text gives you the option to type your own data rather than using SAS variables. If you select Text, the second column will be a blank box where you can type specific information.

3
After you've completed the second column, you will set the Object, Type and JIRA Field.
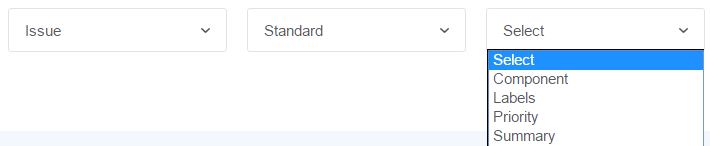
The Object drop down gives you one option: Issue. The Object determines which default fields will be available.
The Type drop down gives you options for Standard or Custom. Selecting Standard will bring up the default fields for the Object you selected. Setting it to Custom will bring up any custom fields that you have built into your JIRA system.
The last drop down will display the Standard or Custom fields within your JIRA setup.
Integrate JIRA Into Your Script
With all of your integration settings complete, you'll need to add the integration into your SAS script.
1
Click the Save configuration button in the lower right corner.

2
A pop-up will open containing the integration link. Right click to copy the link text, or highlight the link with your cursor and press CTRL+C. Then, click OK.
3
To complete the integration, follow the web pop instructions in this article. For convenience, paste the integration link into Word or Notepad. You'll need this handy to paste into the web pop.
NOTE: Some integrations and access to external websites are restricted to designated operator distribution groups. If you are adding either to your script, please reach out so we can make sure your account is assigned to the proper distribution.


