How to configure a Custom Action for data posting to any endpoint URL
While the SAS Desk portal offers a variety of integrations, such as Salesforce, Desk.com, Zoho, MailChimp, and more, we may not have a specific integration for the CRM or marketing software you use. That is where Custom Action comes in. The Custom Action app will automatically push data from your calls into whatever system you are working with, as long as the system has an endpoint URL to capture the data.
In this article we'll discuss:
Connect Your Software to Your SAS Account
1
In the SAS Desk portal, click Apps from the left side menu. From the Apps screen, click the Configure button under the Custom Integration logo.
2
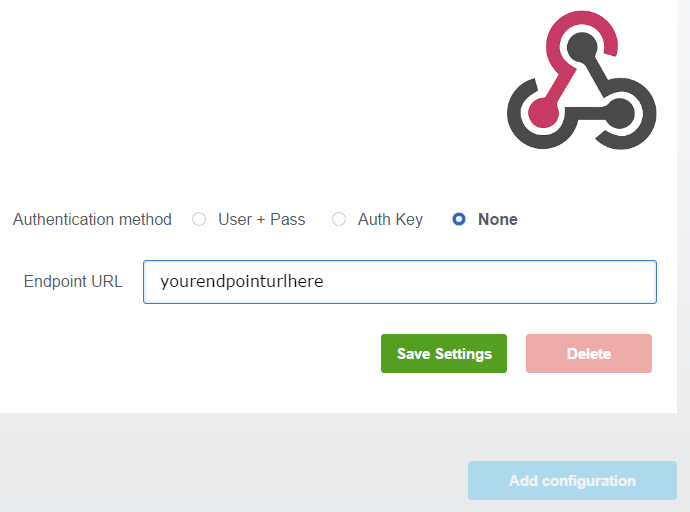
On the next screen, you will have three Authentication methods to choose from when connecting your software to the app:
- Username + Password + Endpoint URL - Enter your username and password, and then include the endpoint URL where the data will be sent.
- Auth Key + Endpoint URL - Enter your authorization key, and then include the endpoint URL where the data will be sent.
- None + Endpoint URL - If there is no authentication method, you can still configure the app to send data to your endpoint URL.
3
Once you've entered your Authentication method, click Save Settings.
Setting Data Parameters
1
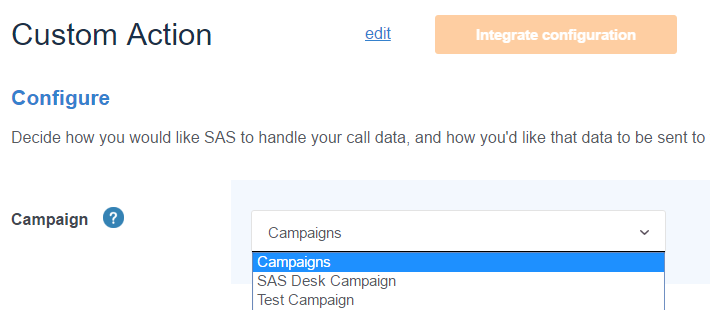
Now that your software is connected to the app, click Add configuration to begin the set-up. The Custom Action integration section will be displayed.

2
First, select the Script that you'll be connecting.
3
Then, select the string Method that SAS will use to post data to your endpoint URL: non-encoded or JSON-encoded.
NOTE: If you choose to post data as a JSON string, be sure to test your integration by creating a Request Bin.

Create Your Message to Post
Once the configurations are set, you'll need to create the content of the message we will be posting to your endpoint URL.
1
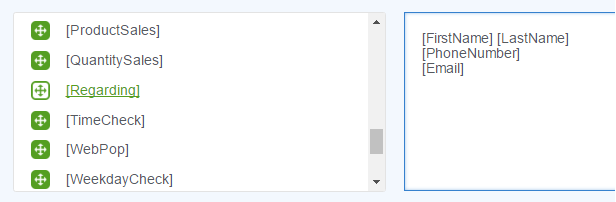
Next to Message to Post, you'll see a list of all of the custom step labels associated with the campaign you selected, in addition to default variables, such as [FirstName], [PhoneNumber], [Email], etc. If you have multiple paths in your script, they will each have a different set of variables. So, you'll need to access the call script builder to determine the step labels in the specific path you are mapping.
Keep in mind that you can build a separate integration for every script path, each with their corresponding step labels.
Click and drag the variables from the left side to the box on the right.
2
After you add the variables that you'd like to appear in the message, be sure to format them by placing each element on a separate line. You can also add headings such as, "Phone Number: [PhoneNumber]."
Integrate Custom Action into Your Script
With all of your integration settings complete, you'll need to add the integration into your SAS script.
1
Click the Save configuration button in the lower right corner.

2
A pop-up will open containing the integration link. Right click to copy the link text, or highlight the link with your cursor and press CTRL+C. Then, click OK.
3
To complete the integration, follow the web pop instructions in this article. Keep in mind that you'll want to create the web pop step at the end of the script path and before the closing.
NOTE: Some integrations and access to external websites are restricted to designated operator distribution groups. If you are adding either to your script, please reach out so we can make sure your account is assigned to the proper distribution.


