How to integrate SAS with Freshdesk
Freshdesk is an online customer resource management system that helps you stay organized by monitoring support tickets, updating your knowledgebase, creating reports, managing communications, and more. If your business uses this software, integrating your account with the Freshdesk app in the portal will automatically push data from your calls into your CRM system. This eliminates the need for you to do double the work, converting messages into Freshdesk entries.
In this article we'll discuss:
Connect Freshdesk with Your SAS Account


Setting Contact Data Parameters


If Send call data on behalf of email provided by caller. is chosen, tasks will be created under the email address the caller provides. Note that if the caller does not provide an email address, data will be sent from notifications@sasdesk.com by default.
If Send call data from notifications@sasdesk.com is chosen, tasks will be created under the email address notifications@sasdesk.com.
If Send data from email address is chosen, tasks will be created under the static email address you enter.

If Don't update existing contacts. Create new ones. is chosen, SAS will look for an email match in your Freshdesk installation. If there is no match, it will create a new task and a new contact. If there is an email match, it will just create a new task.
If Update contacts by overwriting any data with details from SAS. is chosen, SAS will look for an email match in your Freshdesk installation. If there is a match, it will overwrite any existing customer data with data we've received from the call.
If Update contacts by appending details from SAS without overwriting existing data. is chosen, SAS will look for an email match in your Freshdesk installation. If there is a match, it won't overwrite data but will add any new details received.

Create Your Freshdesk Tickets
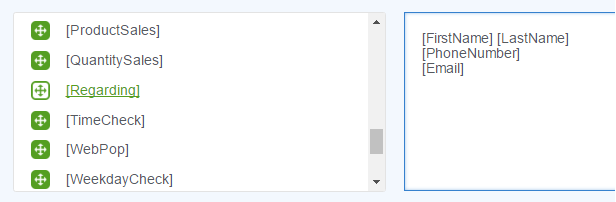
Once the configurations are set, you'll need to create the content of the ticket we'll be starting in Freshdesk.
Keep in mind that you can build a separate integration for every script path, each with their corresponding step labels.
Click and drag the variables from the left side to the box on the right.
Freshdesk Custom Mappings (Optional)
Once the data section is complete, you can map your call data directly to specific Freshdesk fields by adding Custom mappings.

SAS will allow you to use specific SAS script variables to populate Freshdesk's customer and ticket fields. If you select SAS, the second column will allow you to select a script variable.
Text gives you the option to type your own static data rather than using SAS variables. If you select Text, the second column will be a blank box where you can type specific information.

The Object drop down gives you two options - Customer and Ticket.
The Type drop down gives you two options - Standard and Custom. Selecting Standard will bring up the default fields, and selecting Custom will bring up any custom Freshdesk fields you created.
The last drop down will display the Standard or Custom fields within your Freshdesk setup.

Integrate Freshdesk into Your Script
With all of your integration settings complete, you'll need to add the integration into your SAS script.
