How to integrate SAS with Basecamp
NOTE: We are no longer supporting the Basecamp integration in the current version of SAS Desk. In the next release of SAS Desk coming early 2020, Basecamp will be available as a premium application. However, you may still be able to connect Basecamp with SAS Desk through the Custom Action app. Please consult Basecamp API documentation for more information on how to configure it.
Basecamp is online project management software that allows you to organize projects, track communications, and centralize data so that all of your team members know where things are and what needs to be done. If your business uses this software, integrating your account with the Basecamp app in the portal will automatically push data from your calls into your project lists or message boards. This eliminates the need for you to do double the work, converting messages into Basecamp entries.
In this article we'll discuss:
Connect Basecamp with Your SAS Account


Adding a Configuration


Setting Contact Data Parameters
Selecting a Project
Next, use the Project drop down list to select the project name that is associated with the data we'll be collecting.

Now you'll need to tell the system how to manage the caller's details. In the Workflow section, select the aspect of your Basecamp integration where we'll send the caller's data. Subsequent data options may change depending on which of these you select.

Selecting this option will create new To-do List items based on the information that the caller provides.

Support > Create and manage Messages.
Selecting this option will create new messages and post them to the Message Board for the Project you specified.
Create Your Basecamp Entry
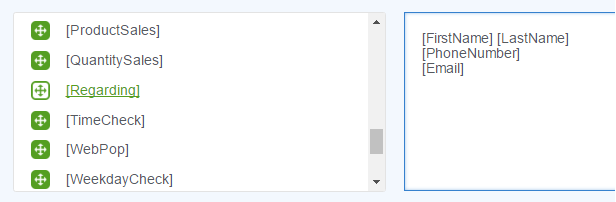
Below the Custom mappings heading, you'll create the content of the new entry we'll be pushing to Basecamp.
Keep in mind that you can build a separate integration for every script path, each with their corresponding step labels.
Click and drag the variables from the left side to the box on the right.
Basecamp Custom Mappings (Optional)
Once the data section is complete, you can map your call data directly to specific Basecamp fields by adding Custom mappings.

SAS will allow you to use specific SAS script variables to populate existing Basecamp fields. If you select SAS, the second column will allow you to select a script variable.
Text gives you the option to type your own data rather than using SAS variables. If you select Text, the second column will be a blank box where you can type specific information.

If you've selected the Support - To-dos workflow, the Object dropdown will give you the option for To-do. If you've selected the Support - Messages workflow, the Object dropdown will give you the option for Message.
The Type dropdown will give you the option for Standard. Selecting Standard will bring up the default fields for the Object you selected.
The last dropdown will display the Standard fields within your Basecamp setup.

Integrate Basecamp into Your Script
With all of your integration settings complete, you'll need to add the integration into your SAS script.
