How to Integrate SAS Flex with Salesforce
Salesforce is an online customer resource management system that enables you to create and keep track of accounts, contacts, cases and leads. If your business uses this software, integrating your account with the Salesforce app in the portal will automatically push data from your calls into your CRM. This eliminates the need for you to do double the work, converting messages into CRM entries.
In this article we'll discuss:
Connect Salesforce with Your SAS Account


Setting Contact Data Parameters


Support > create and manage Contacts & Cases
Selecting this option will update existing CRM contacts, create new contacts, and create new cases based on the information that the caller provides. Collecting an email address from the caller is not required if this option is chosen.

Support > create and manage Accounts & Cases
Selecting this option will update your CRM accounts and create new cases based on the information that the caller provides. Collecting an email address from the caller is not required if this option is chosen.

Account Setting
For both Support workflow options, use the Account Setting section to determine whether or not the customer can see the original case body information that was mapped from your Salesforce integration.

Sales > create and manage Leads
Selecting this option will update existing leads in your CRM, or create new leads, based on the information that the caller provides. If the Sales workflow option is selected, you can configure the app to either search for a contact if no lead is found, or add the lead to a specific Salesforce campaign. Collecting an email address from the caller is required if this option is chosen. If no email is provided, the data will not push through.

Add Email
For all 3 workflow options, you'll have two options under the Add Email section:
- Select Populate Salesforce with email provided by the caller. to populate new leads/entries with the email address our operators collect. If the caller does not provide an email address, no email will be logged in Salesforce.
- Use the Populate static email address. option to enter an address that will be displayed in all leads/entries from SAS.

If Don't update existing contacts. Create new ones. is chosen, SAS will look for an email match in your Salesforce installation. If there is no match, it will create a new case and a new contact. If there is an email match, it will just create a new case.
If Update contacts by overwriting any data with details from SAS. is chosen, SAS will look for an email match in your Salesforce installation. If there is a match, it will overwrite any existing customer data with data we've received from the caller.
If Update contacts by appending details from SAS without overwriting existing data. is chosen, SAS will look for an email match in your Salesforce installation. If there is a match, it won't overwrite data but will add any new details received.

Salesforce Custom Mappings (Optional)
Once the data section is complete, you can map your call data directly to specific Salesforce fields by adding Custom mappings.
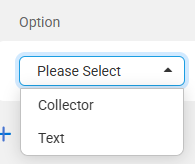
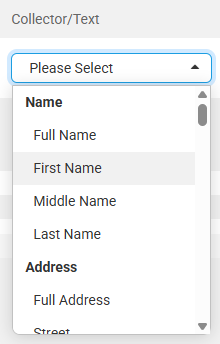
Collector will allow you to use specific SAS script variables to populate existing Salesforce fields. If you select Collector, the second column will allow you to select a script variable.
Text gives you the option to type your own data rather than using SAS variables. If you select Text, the second column will be a blank box where you can type specific information.
If you've selected the Support - Contacts & Cases workflow, the Object dropdown will give you options for Case or Contact. For Sales, the Object is Leads. In Salesforce, Case, Contact and Leads all have their own default fields. The Object determines which default fields will be available.
The Type dropdown gives you options for Standard or Custom. Selecting Standard will bring up the default fields for the Object you selected. Setting it to Custom will bring up any custom fields that you have built into your Salesforce system.
The last dropdown will display the Standard or Custom fields within your Salesforce setup


Integrate Salesforce into Your Script
When all of your integration settings are complete, contact SAS at service@specialtyansweringservice.net to add the integration into the appropriate block in your SAS script, or follow these instructions to integrate the app yourself.
If you've disconnected and reconnected your configuration at any point, you'll need to re-integrate it into your script.