Learn About the Premium On-Call Add-On
With this feature, you'll have access to more on-call options, enhanced on-call reporting, and the ability to create back-up schedules if the first employees fail to acknowledge receipt of the notification.
Users must be on our SAS Flex Billing platform in order to activate the On-Call Add-On. For pricing and purchasing information, see your Flex portal.
In this article we'll discuss:
How to Activate the On-Call Add-On Feature


Configuring the On-Call Add-On Feature
Once the On-Call Add-on feature has been activated, you'll need to set your Reach Message Type. You can choose from one of the standard Reach Message types, or choose one of the three options available to you with the On-Call Add-On, as outlined below.

Serial Recording
If this option is chosen, we’ll dial out all staff members included in your schedule consecutively, and play the recorded phone call.
With a Recording Reach, if call recording is not active on the line, the system will not be able to send anything.
Serial Text to Speech
If this option is chosen, we’ll dial out all staff members included in your schedule consecutively, and our TTS system will relay the message.
Once selected, you can choose to send a Default message, which includes the caller's Name, Number and Regarding, All collected data or a Customized message. To customize the message, use the Variable picker drop down to view all applicable script variables. Once a variable has been selected from that list, the Copy merge field box will convert whichever variable you choose into the appropriate format, which you can then copy and paste into your message.


Phone to SMS
If this option is chosen, we’ll dial out to your on-call staff. The staff member who answers and acknowledges the reach by pressing 1 will receive a text message after they have acknowledged the reach with the message details.
Once selected, you can choose to send a Default message, which includes the caller's Name, Number and Regarding, All collected data or a Customized message. To customize the message, use the Variable picker drop down to view all applicable script variables. Once a variable has been selected from that list, the Copy merge field box will convert whichever variable you choose into the appropriate format, which you can then copy and paste into your message.
For any Reach Message types aside from SMS are chosen, users can also choose to use the Notify after receipt toggle to alert other scheduled staff members when the message has been accepted. The available options are listed below:
- Everyone: If this option is chosen, everyone listed in the on-call schedule for that day will receive a notification that the message has been picked up.
- Add supervisor to notification: If this option is chosen, users can select up to 2 Profiles belonging to a supervisor to also receive notification that the on-call message has been picked up.
- Only prior recipients: If this option is chosen, only the staff members who have already been notified of the message will receive notification that the message has been picked up. It will not go to any staff members who have yet to be notified.

If the SMS Reach type is chosen, the alert will go to everyone by default. Users can also choose to use the Notify on Non-Receipt toggle to alert other scheduled staff when a message has not been picked up. With this option, users can also select up to 2 Profiles belonging to a supervisor to receive notification that the on-call message has not been picked up.

Calculating Dial-Outs for Serial Recording or Serial TTS Reach Types
If you choose either the Serial Recording or Serial Text to Speech Reach types, the number of dial outs our system can do is different than our standard on-call system. For example, in our standard on-call system, you can have a total of 10 dial-outs per shift or rotation. This means that if you have 2 staff members scheduled, our system can reach out a max of 5 times (5 attempts x 2 staff = 10 total attempts). However, with the On-Call Add-on feature, this number is greatly increased.
In the On-Call Add-on feature, the system will call through all of your scheduled staff members and count it as 1 attempt. Then it would repeat until all attempts are exhausted (based on the Type you've set) or until the call is answered. For example, if there are 4 staff members scheduled, our system would dial out to all 4 in order, which would be considered 1 Reach attempt. So, if 4 staff members are scheduled and the 2x + End Type is chosen, that would result in 32 total dial outs.
Removing the On-Call Add-On Feature
If you no longer want access to the On-Call Add-on, you can remove it right from your portal.


Additional Features Included with the On-Call Add-on Feature
With the On-Call Add-on feature, you also get access to the following:
Enhanced On-Call Reporting
This feature shows stats like longest response time, fastest response time, average time for numbers to acknowledge, likelihood a number will acknowledge, etc.


The circle graphs shown below will show you a total incident count over the date range you've selected, as well as incidents by outcome and dispatch type. The dispatch type will match up to the Reach Message type you've configured.

Number of notification attempts
This graph will show you the number of notification attempts, or how many times our system tried to reach out to your staff over the date range you've selected.

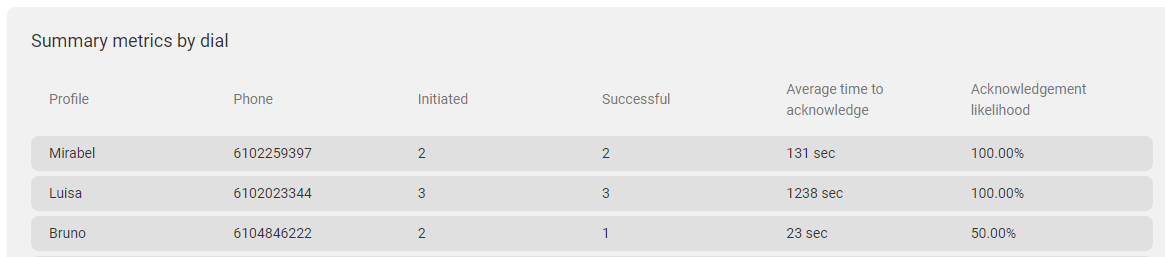
Summary metrics by dial
This table will show you:
On-Call Backup Schedule
This feature allows you to initiate a second on-call rotation if the first fails. For example, if your initial Reach attempt is using the SMS option, you may want your backup attempt to use the Text to Speech option instead, or you may want a different set of staff members to be listed for back-up attempts.


