Setting up Business Hours Routing with an Advanced IVR
For clients who want their IVR to change based on the time or a specific date range, a Date/Time Routing option can be added within an advanced IVR, which will automatically route callers one way or another based on the time or day that they called.
In this article we'll discuss:
Updating the Main IVR Greeting
All IVRs must start with a Greeting. This will be considered your "main menu" and will provide callers with subsequent options. When working with a Date/Time Routing option, you can either have the caller press a prompt from the main Greeting to navigate through the IVR, or you can configure settings which will automatically route them if nothing is pressed. In this tutorial, we'll give the caller a prompt.
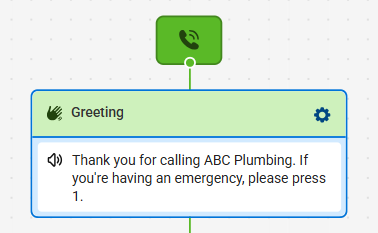
In our example, we'll using just 1 prompt option for all callers.

If you don't want to give callers a prompt and instead have the system automatically route them through to the Date/Time configuration, your greeting can say something like "Thank you for calling [Company Name]. We'll be with you in a moment." Then, under the Options section, have both the Wrong Button and No Action options transfer to the extension you've configured within the Logic section.


Creating and Adding a Date/Time Routing Option


- Business Hours - This option will use the business hours set or holiday set you've already created with your account's settings. If you choose the Business Hours option, you'll want to make sure your business hours set is selected in the Options gear within the IVR workflow.
- Specific Dates: If this option is chosen, users will be able to configure specific dates they want the IVR to change how calls are handled.
- Specific Times: If this option is chosen, users will be able to configure specific times they want the IVR to change how calls are handled.
- Specific Days: If this option is chosen, users will be able to configure specific days they want the IVR to change how calls are handled.
- Range Times: If this option is chosen, users will be able to configure specific range times they want the IVR to change how calls are handled.
- Range Days and Time: If this option is chosen, users will be able to configure specific range days and times they want the IVR to change how calls are handled.


To continue configuring your IVR, click on the + node and select the next option based on your needs. For a breakdown of all IVR options, check out this article.

