Setting up an Employee Extension with an Advanced IVR
For clients who want callers to be able to dial an extension to reach a specific employee, Employee Extension options can be added within an advanced IVR. There are two types of employee extensions that can be created:
To use the Employees option within the Greeting block, you must use the available employee extension options (800-899) and configure individual Employee Extension blocks. If you want callers to be able to dial numbers 1-9, you'll need to use the Logic option within the Greeting block instead and configure either individual Employee Extension blocks OR individual Transfer to Number blocks. In this tutorial, we will be utilizing the Employees option and configuring individual Employee Extension blocks.
In this article we'll discuss:
Updating the Main IVR Greeting
All IVRs must start with a Greeting. This will be considered your "main menu" and will provide callers with subsequent options. In this example, we'll update our main IVR greeting to include options for an Employee Extension.
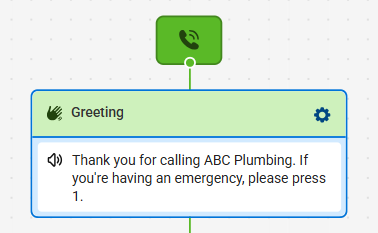
In our example, we'll add 3 employee extensions that callers can dial.

If you want a different message to play when you are closed for after hours or holidays, use the Away audio message toggle, then choose Play when we are closed from the Frequency dropdown and add your respective greeting.


Creating Employee Extension Blocks


If you want a different message to play when you are closed for after hours or holidays, use the Away audio message toggle, then choose Play when we are closed from the Frequency dropdown and add your respective greeting.

If you choose the voicemail option, you'll need to choose an Outcome and select the Profile(s) you would like voicemail messages to be emailed to. When you are done, move on to step 5.

If you choose the Transfer caller option, you'll need to select a Profile and number where transfers should go. Then choose an Outcome which will help you easily identify these types of calls within your IVR log. Next choose your Transfer audio message.

If you want to configure additional transfer settings, expand the Additional transfer settings menu. First, choose which number you'd like to display when a call is being transferred from the IVR.
- SAS Number: This option will display the SAS number attached to your IVR when we transfer.
- Callers Number: This option will display the caller ID of the caller when we transfer.
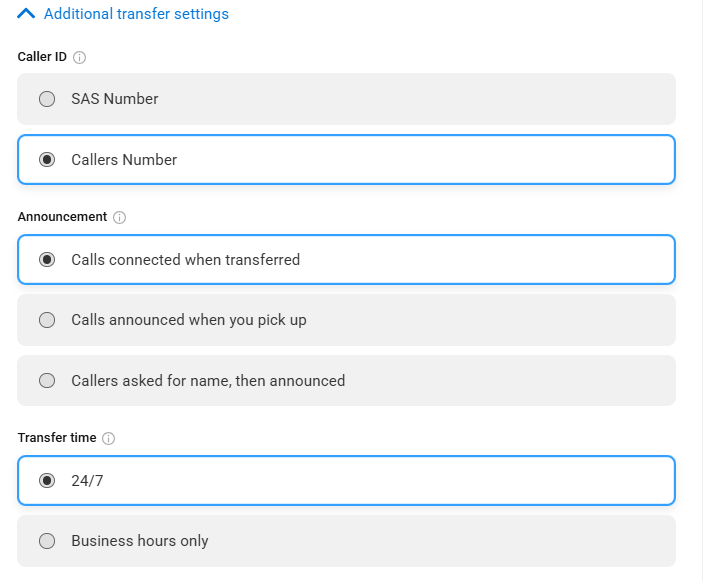
Next, choose what happens when the call is being transferred.
- Calls connected when transferred: Choosing this option will transfer the caller without any prior announcement, and will not give you the option to accept or reject the call.
- Calls announced when you pick up: Choosing this option will play an announcement for you prior to the transfer. You can choose to either accept or reject the transfer.
- Callers asked for name, then announced: Choosing this option will ask the caller to say their name which will play for you prior to the transfer. You can choose to either accept or reject the transfer.
Next, choose a Transfer time.
- 24/7: This option will allow us to transfer calls 24/7
- Business hours only: This option will only transfer during business hours. If you choose this option, you will need to have already created a business hours set and select your business hours from the Options menu within your IVR workflow
